Operating System (OS)
Anti Virus
SERBA SERBI
GAME NEW
Recent Articles
Tutorial Photoshop How to make text effect creative posters

In this tutorial we are going to learn how to make a poster inspired by WWF creative posters. With a couple of images, we will create a beautiful realistic typography with natural theme. We will learn how to blend these images together to make them become a nice one. This tutorial is full of tricks and tips to manage layers and your images.
PDF File Download
http://www.filesonic.com/file/2002573831Resources
* Grass - Alegion-stock
* Splash - Best-stock
* Lotus Flower - AJK-orginal-stock
* Floral Frames - free sources
* Water Fall - free sources
Step 1 - 10
Step 1
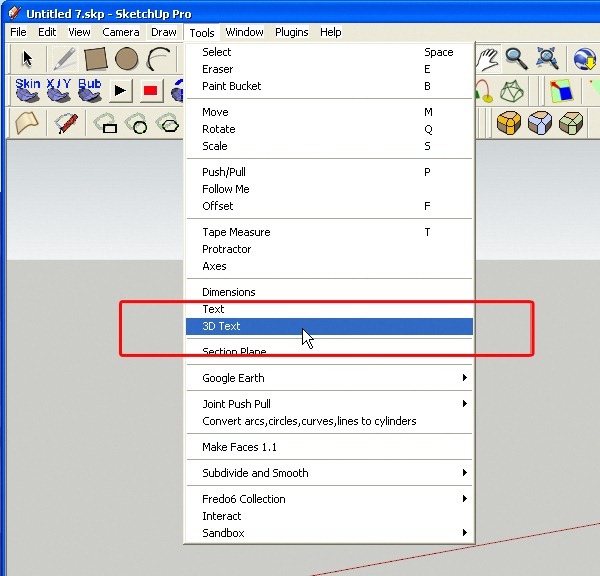
We start with Sketch Up Pro - a free 3d software of Google - to make a 3d typography. Of course you can use any other 3d software to do this.
In Sketch Up window. Choose Tools>3D Text
Step 2
A new window appears! Now simply type your text in. I typed "PRO" here. You could choose any font you want to as long as it's beautiful :). Please set Height and Extruded like the image. Then just click Place or press ENTER.

Step 3
And your 3D text appears.
You can handle your camera easily by middle mouse click and drag to orbit; and scroll mouse to zoom in / zoom out. You can move your text by press "M" then click in your text and just drag it.

Step 4
Repeat step 2 to make "TEC" text and "TOR" text ; then move it like this:

Step 5
Click Rotate tool or just press R while still selecting 3 texts

Step 6
Then click your rotate tool on the side of the text ; then click and drag to rotate it ( on blue axis ) to make the texts "stand up" like this.

Step 7
Now select one of your texts - then press S - ( this is Scale tool ) - then click and drag your text like this to make it thicker.

Step 8
Repeat step 7 for all your texts to have this:

Step 9
click on PRO to choose it. Then double click to open it. Then double click again to select all of it. If your text is covered with blue dots like this then it's fully selected!

Step 10
While selecting the text. Click this button ( in the image ) to use the plugin (Round Corner) . Then setting like below. And press ENTER to execute

Step 11 - 20
Step 11
Just wait a few second and the plugin will make nice round corner for your text!. Do it again for "TEC" and "TOR" to have this. Then use the ROTATE TOOL again to adjust "TEC" a little on red axis to make dynamic feeling.

Step 12
Press "M" or click this icon to access Material dialogue. Then choose this nice cyan color ( or any light color you like for your text ) ; then you just click the text to fill material. Do it again for all 3 texts. I just want a little color for the best render image ( maybe white is just ok - but I prefer a little hue )

Step 13
Now adjust your camera to this nice view. We will render this view.

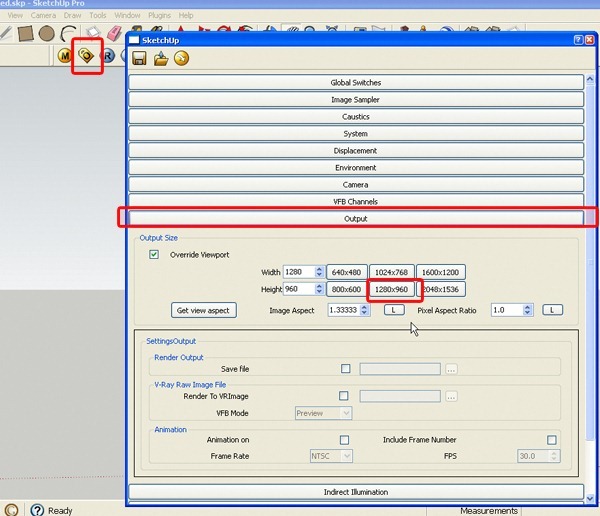
Step 14
You will need Vray for Sketchup - a well-known render engine - . We don't have to setting much because the default setting of Vray is already nice enough. I just need to adjust a little about image size.
Click Option Icon like in image. Then choose Output tab. And choose your size. I'm choose 1280x960 here. It's nice to have bigger size but please remember that the larger size , the longer time you have to wait.
Step 15
After that. Press this "R" button to start render. And go have a cup of tea. But I think this don't take long.

Step 16
After the render finished, Press save icon and save your image.

Step 17
Please note that Vray will save 2 jpg files for you. One is the rendered picture, and one is alpha channel of this picture. It's cool and you can easily handle this in Photoshop.
Now we done with Sketchup. Back to our Photoshop!

Step 18
Open "Waterfall in the mountain 02" in camera raw to make some adjustments. Setting as below.
You can open your image in camera raw by right click it from Adobe Bridge > open image in camera raw.
Or do it directly by access in Photoshop Edit>Preferences>File Handling / Then tick "Prefer camera raw for jpeg file" > OK.

Step 19
Open image in Photoshop. Maybe you want to make your back up for the image. Just Press Ctrl + J to duplicate the image, then hide the one below.

Step 20
Next, open 2 rendered files. Double click on the layer name and name it PROTECTCOLOR and PROTECTCOLOR.Alpha

Step 21 - 30
Step 21
Now we can take advantage of the alpha channel. Select PROTECTCOLOR.Alpha layer, use Magic wand ( or press W ) to select the white space

Step 22
Then click on PROTECTCOLOR layer , and click on Add vector mask icon at the bottom.

Step 23
And this is it! We have nice 3d typography without background. Now you can hide or just delete PROTECTCOLOR.Alpha layer.

Step 24
Use Ctrl+T to scale and move your typography like this. Try to make the typography like standing on the mountain. I named the typography layer PROTECT, then duplicate it ( CTRL + J ). Set blending option of PROTECT layer ( below ) is Screen ; and the duplicated layer is Multiply. This setting will blend your text into the background.

Step 25
Make a new layer below PROTECT and name it SHADOW_TEXT. Change blending option to Multiply.
Then choose BRUSH TOOL , opacity 20-30% like this setting.
Use your imagination to draw the shadow of the text on the rock cliff.

Step 26
The shadow will goes like this...

Step 27
Now create another layer below SHADOW_TEXT ; name it BLENDING_TEXT , setting as below.
Use the brush again, but this time choose green color like below , you can also pick the color from the text.
Now draw around the text - there is always color blending between objects and background. The rock cliff will reflect the color of the text.

Step 28
If you did right, you will have this. You could change opacity of BLENDING layer and SHADOW layer to have right effect.

Step 29
Now open Flor_Frames (4).jpg in new file. Press CTRL + A > CTRL + X > CTRL + V and you will have this.

Step 30
Pick your foreground color is white. Then Select> Color Range > Just click OK

Step 31 - 40
Step 31
Color range will select all the white space in the image for you. Press delete to get rid of this.

Step 32
Done. But there are some white space isn't selected so they are not deleted.

Step 33
If you have CS5 , cool! You have a magical tool here : Magic Eraser Tool. Just use it to delete all the leftover.

Step 34
A little time and you will have this clean image!

Step 35
Then just copy it to our file, then name the layer "LEAF".

Step 36
Please make the back up by duplicate ( CTRL + J ) the layer.
We will need a lot of back ups this time. I will show you later.

Step 37
Next , open Flor_Frames (3).jpg in new file. And delete the background just like above.( color range then use Magic Eraser Tool )

Step 38
... And you have this!

Step 39
Do the same thing as above. Paste it in our file , then name it LEAF 2 , and also make back up - lots of it .

Step 40
Now we come to the important part. We will make leaves grow around the text.
Pick a layer LEAF 2 (you must already have a couple back ups of this layer )
Then use CTRL + T to transform , scale , rotate , move your leaves until you find the part compatible with the scene. These actions need lots of your imagination so try hard.
For example in the image below I found the part (in red circle) of LEAF 2 seem to be fit with "O" letter. So I adjust it with "O" letter, then I use ERASER TOOL ( E ) to get rid of all leaves that won't work anymore.

Step 41 - 50
Step 41
And I'm think these leaves are not so perfect so I pick STAMP TOOL and set Sample: Current Layer.
With STAMP TOOL, Alt + Click at some nice leaf in the image , then click to imperfect part of the leaves image , STAMP TOOL will fill a nice leaf in for you. Cool tool, huh?

Step 42
Keep doing all these steps with another LEAF layer, remember to always have a back up before you transform and delete a layer.

Step 43
I'll do it again, this time I found the part in red circle is quite good with "R".

Step 44
So I transform it to fit "R" letter, then delete all of the others. After that I'll use Stamp tool if it's needed

Step 45
Keep doing it again and again with maybe 8 - 9 leaves layers. I use 10 layers below.
Now you could choose 1 of 2 ways to manage a dozen of leaves layers.
1/ You can choose all the leaves layer, and press CTRL+ E , and they will merge into only one layer.
I also do this way. It's not a great way to manage your layers all the time, but It helps keep your file not so heavy, and this way make next steps be easier.
2/ You can make a group folder and name it LEAF like I do below. Then choose all your leaves layers and drag them into the LEAF group.

Step 46
Now with all the leaves on one layer, I use Stamp tool again to complete all parts. I also add some details that come underneath the text to make a depth.

Step 47
Now we will make a shadow for the leaves.
Create a new layer below Leaves Layer. Name it LEAF SHADOW. Then set it to Multiply blending mode.
Choose Brush tool, set opacity to 11%, use black color.

Step 48
Use your imagination here to draw shadow for the leaves. We pretend that light source come from above, so the shadow will cast below.

Step 49
Just like this. It will need some drawing skills here.

Step 50
After adding shadow, your graphic will looks like this.

Step 51 - 60
Step 51
I hide the leaves layers for you to see the shadow layer clearly. It will looks like this.

Step 52
Now time for some brushes.
Open grass6_alegion-stock.png file. Name its layer GRASS.

Step 53
Right click on GRASS, if your layer is in smart object mode, you will see Rasterize Layer, click it. If you don't see, Its ok , your layer is already in Rasterize mode.
I will explain about Smart Object and Rasterize a little. Smart Object is just like a vector, you can scale it in and out without losing any detail, but you can't do anything to Smart Object but transform them.
Otherwise, Rasterize is a normal layer that we usually meet in Photoshop. When you scale it into smaller size then scale it again to bigger size, it will lose some detail.

Step 54
Now with rasterize Grass layer, press CTRL + L ( Levels ) and setting like this.

Step 55
Now right click again in Grass layer then Convert to Smart Object. You don't need to adjust this layer anymore, just transform it.

Drag your Grass layer below of PROTECT layer, then transform it ( CTRL + T ) like this.

Step 57
Duplicate your Grass layer ( CTRL + J ) to make some other brushes, I put them in like this. I also hide PROTECT layer for you to see them clearly.

Step 58
If you did it right, we will have this.

Step 59
Now time for some nice splashes.
Open Splash_I_by_BestStock.jpg in new window. CTRL+A > CTRL+ X > CTRL + V. And you will have this.

Step 60
Time for a little magic! Pick Magic Eraser Tool and delete all the back ground, we just need a splash.

Step 61 - 70
Step 61
Use Eraser tool to make it clean and nice. Don't worry about how it looks like, we will only need a splash.

Step 62
Open Splash_V_by_BestStock.jpg file and do the same thing.

Step 63
Now paste this two images to our file. Name it SPLASH1 and SPLASH2.

Step 64
Pick Splash2 layer, press CTRL + U ( Hue/Saturation ) and setting like this.

Step 65
Next, press Ctrl + L ( Levels ) with this setting.

Step 66
Pick SPLASH1 layer and CTRL+L for Levels adjustment

Step 67
Still SPLASH 1, now for Hue/Saturation Adjustment ( CTRL + U )

Step 68
Okay. Now just like step 40, just like what we did with the leaves, now we did with the splashes!
Make lots of back ups for Splash1 and Splash2 , then one by one transform them to their position.
You can see that water come from above, so the splash could be anywhere especially at the bottom of the texts.

Step 69
Use Splash 1 and Splash 2 to make various splash type by scale them, rotate them, erase them.
You should be patient in this step, and some imagination as well...

Step 70
I make splashes on the ground , all over the text, just like this.
Make sure you have a good layer management with these splashes layers. You could use 2 methods to manage them like I said above.

Step 71 - 80
Step 71
If I hide all the layer but splashes layers and brushes layers , you will see like this:

Step 72
We nearly come to an end.
Now for the focal point of the picture: the lotus. Open Flower_stock_2_by_AJK_Original_Stock.jpg file in new window. Ctrl+A > Ctrl+X > Ctrl + V.
The background of this image is quite simple. You can easily delete it by Magic Eraser Tool ; or use Magic Wand Tool to select then press Delete.

Step 73
After delete all the background, copy and paste the lotus into our file. Name its layer LOTUS.

Step 74
Drag LOTUS layer below of LEAF SHADOW layer, then CTRL + T to transform it to fit the void of "O" letter.

Step 75
While selecting LOTUS layer, click Create Adjustment Layer button at the bottom right, then choose Hue/Saturation like this.

Step 76
The Hue/Saturation setting :

Step 77
Right click on Hue/Saturation LAYER you've just created then choose Create Clipping Mask; then the adjustment layer will apply to only LOTUS layer

Step 78
Create another Adjustment Layer, choose Exposure like below:

Step 79
Create new layer below LOTUS layer and name it LOTUS SHADOW, set blending mode to Multiply.
Step 80
Pick Brush Tool , change opacity to 6%, black color, and use your imagination and skills again to draw lotus's shadow. Please mind how the shadow casts on the edge of "O" letter.

Step 81 - 90
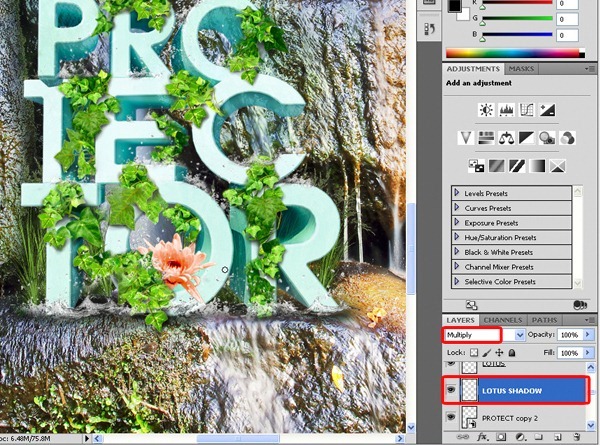
Step 81
Create another layer above Lotus shadow layer, set Multiply for blending mode, choose brush with 11% opacity, and the color is picked from the lotus to make a color blending area around the lotus.

Step 82
The color of the lotus is also influenced by the color of the leaves around it. So create another layer and name it Lotus Blending 2 - Multiply blending mode - opacity 55%. Then pick the color of the leaves and use the brush to draw the blending area on the lotus.

Step 83
Duplicate your Lotus Layer to have Lotus copy layer. ( Use Ctrl + J on Lotus layer )

Step 84
Now set Lotus layer to Screen Blending mode , and Lotus copy layer to Multiply Blending Mode. It will help the blending more effective.

Step 85
Now it's nearly done!
Grab the Crop Tool and Crop your image. Please mind that there are 4 golden points in your image ( I spotted them below ). Try to keep these 4 points in something important.

Step 86
Create a new layer on the top of all layers. Then press Ctrl+Shift+Alt+E to make a Stamp Visible to this layer. Name it ALL.

On ALL layer. Choose Filter> Blur> Lens Blur.

Step 88
On Lens Blur dialogue, have this setting:

While selecting ALL layer, click Add Layer Mask Button at the bottom. Then pick Brush Tool with 11% Opacity and black color to paint on the mask.
Mind that your painted area with disappear. So to make a good focus effect , try to paint all the PROTECTOR text, and a little of the background around the text.

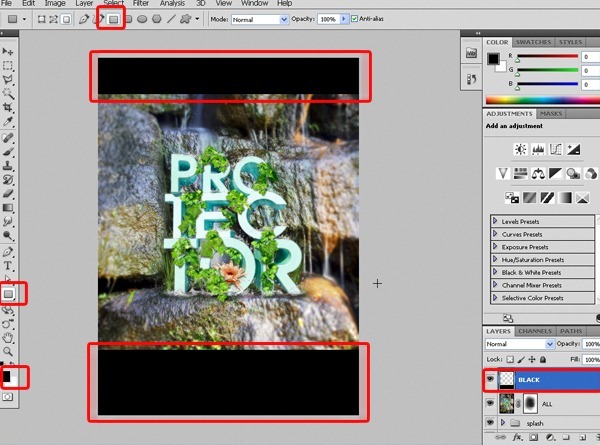
Next step, Create new layer above ALL layer , name it BLACK.
Pick Rectangle Tool ( Press U ) , black color and draw 2 black rectangles like below, then adjust the opacity of the layer to 80%
Step 91 - Final
Step 91
Create another layer above BLACK, name it LINE. Use Rectangle Tool in white color to draw one thin rectangle like this.

Step 92
Choose Filter> Blur > Motion Blur . Setting Angle to 0 and distance in 284

Step 93
Duplicate LINE to have 2 nice lines just like this:

Step 94
I also added some texts and WWF logo to make this picture more epic ( lol - it's just a fake for fun but I love to make something for the WWF, I hope they don't mind it )

Step 95
On the top of all layers, create a adjustment layer , choose Photo Filter , choose Deep Yellow and 25% Density. More epic, huh?

Want some more epic ? Then create another adjustment layer, get Exposure with this settings:
And we've done!

Final Results

Spesial Thank to XIN KUN for tutorial
source http://photoshoptutorials.ws/photoshop-tutorials/text-effects/create-a-nature-text-effect-poster-in-photoshop.html

Related posts:
Language:
Sign up to receive breaking news as well as receive other site updates!
0 comments for this post
Leave a reply
Subscribe to:
Post Comments (Atom)
Update Information


Sponsors


Recent Stories
Premium Advertise

Categories
- Anti Virus (23)
- Aplle (6)
- Browser (9)
- Converter (24)
- Crack (5)
- Dewasa (1)
- Driver (7)
- Driver laptop (4)
- Game PC (82)
- Internet (38)
- Mac (8)
- Multimedia (51)
- OS (11)
- Office (16)
- Other (7)
- Player (17)
- Theme (9)
- Theme 7 (6)
- Theme XP (5)
- Tips dan Trik (6)
- Tool (94)
- Tutorial (5)
- Umum (15)
- Update (6)
- Windows (16)
- editing (13)
- game (82)
- koplo (4)
- linux (3)
- musik (3)
- notebook (5)
- portable (13)
- software (161)
Blog Archive
-
▼
2011
(368)
-
▼
October
(78)
- Download kenceng dengan Internet Download Manager ...
- Portable Mozilla Firefox 7.0 beta 6
- Memutar musik dan video dengan Winamp Pro v5.622
- Call of Duty: Modern Warfare 2 Game PC
- kumpulan wallpaper bagus dan spektakuler buat kole...
- Download Yamicsoft Windows 7 Manager 3 0 2 x86/x64...
- Microsoft Office Professional Plus 2007 Blue Editi...
- Download Full CorelDRAW Graphics Suite X5 v15.2.0....
- WinRAR 4.10 Beta 2 x86/x64
- Trillian 5 Pro for Windows v5.1.0.12 BETA
- Red Faction Armageddon Path to War DLC Update
- Insane 2-SKIDROW Game PC
- Airline Tycoon 2 Game PC
- eViacam asetstudio 1.5.1
- UltraISO Premium 9.5.0.2800 Multi RETAIL Incl. Keygen
- Collectorz.com Movie Collector Pro v8.1.1
- Red Faction: Armageddon Game PC
- Dragon Age 2 Mark of the Assassin Expansion-RELOAD...
- Archive Blog
- Pro Evolution Soccer 2012-RELOADED Game PC
- RealVNC Enterprise v4.6.3 Incl. Keymaker
- Might and Magic Heroes VI Game PC
- Orcs Must Die Fix Update
- TuneUp Utilities 2012 v12 0 Incl Keymaker
- mIRC v7.22 Download Full versi
- SUPERAntiSpyware PRO 5.0.1132 Incl Patch and Serial
- WRC FIA World Rally Championship 2011 Game PC
- Shaun White Skateboarding Update Fix 1
- Worms Ultimate Mayhem Update 1
- UltraIso Premium Edition v9.5
- Global Ops Commando Libya Game PC
- A Game of Thrones Genesis Game PC
- Dangdut Koplo Om Sagita Album Lagu Anak Populer
- PDF-XChange Pro v4.0198.198
- Windows 8 Skin pack 6 For Windows 7 x64 x86 new
- Orcs Must Die-SKIDROW Game PC
- Classic Menu for Office Enterprise 2010 v4.0
- Dead Rising 2: Off The Record Game PC
- Disciples III Resurrection-RELOADED Game PC
- FIM Speedway Grand Prix 4 Game PC
- Warhammer 40.000 Space Marine Game PC
- ImTOO HD Video Converter 6.6.0 build 0623
- Yamicsoft Windows 7 Manager v3.0.1 Final (32bit & ...
- Windows 7 Loader v2.0.8 (x86-x64) by Daz
- Clean MyPC Registry Cleaner
- Sony Vegas Pro v10.0e (32-64 Bit) by DigitalInsanity
- Portable FixCleaner 2.0.4287.701
- Super Utilities Pro 9.9.60 Portable
- Xilisoft Video Converter Ultimate 6.7.0 Build 0913
- Space Pirates and Zombies Game PC
- Tutorial Photoshop How to make text effect creativ...
- In Search of the Lost Temple v1.0.0.1 Game PC
- CyberLink PowerDVD Ultra v11 0 2024 Multilingual
- How to Get Media Into the Computer for Editing II ...
- Off-Road Drive Game PC
- WinRAR 4.10 Beta 1 x86 and x64 incl. key
- Shaun White Skateboarding Game PC
- How to Get Media Into the Computer for Editing I -...
- HUD Premium Theme zip Download
- Setting You Settings in Edius Pro - Edius Tutorial
- ChessBase 11 - RELOADED Game PC
- How to Make a WarHammer 40k Rusted Steel Shed and ...
- ESET TNOD USER and PASSWORD FINDER for ESET – VERS...
- Internet Download Manager 6.07 Build 12 Retail Full
- Heavy Freight Simulator Game PC
- Adobe Photoshop Lightroom v3.5 Multilingual Incl K...
- The Cursed Crusade - RELOADED Game PC
- Worms Ultimate Mayhem Crackfix Game PC
- Railworks 3 Train Simulator 2012 Deluxe Game PC
- Two Worlds II Pirates of the Flying Fortress-RELOA...
- Naruto Shippuden episode 230 Subtitle English
- Fifa 12 - BLACKBOX Download 2.4Gb Game PC
- VSO Software Blu-ray Converter Ultimate v1 2 1 19 ...
- EVEREST Ultimate Edition
- Extreme Movie Manager v7 1 4 1 Deluxe Edition Full
- YouTube Music Downloader v3 7 8
- Extreme Games Manager v1 0 3 0 Full version
- FastStone Capture v7.0 Incl Keymaker
-
▼
October
(78)
Facebook Fans


Site Info dan Back link


